
This render shows the veiwing platform from the doorway.

 As you can see i have tried to make it as realistic as possible.


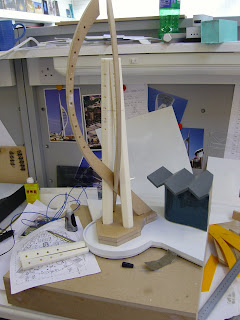
 Below you can see that i have sanded and filled the tower legs attached the bows and top part of the tower and even started threading the lighting system through the tower to make sure it will fit.
 Here you can see i have made the roof of Gunwharf and one of the Balconies. I made the the roof using acrylic cut certain widths and then sanded at a 35 degree angle and glued together. This process worked well. I previously tried to cut the roof out of on soild piece of MDF, this however didn't work very well.

 Here is the cladding for the harbour building using 1mm acrylic and laser etched detail. I then heat bent them to the shape of the building using the vacuum formers.
 I made the pontoon out of 6mm clear acrylic using the laser cutter to etch the detail on aswell.


 I was able to find these photos of the tower being constructed. Having looked at them again it was constructed in a very similar way to the way I constructed my model of the Tower. Building the base first, the legs in sections, building the bows and ribs and finally placing the spire on the top.
 I also loooked in to using fibre optics for the lighting as they were slim and would be easy to fit up through the tower. The type of lighting i needed to use would have to be no more that 3mm in diameter as it would have to slide through the rung of the tower. I came to the conclusion that fibre optics wouldn't that beneficial as i could find any that were suitable. The lighting needed to be bendable and for this reason fibre optics wouldn't be great. Although fibre optics bend i couldn't guarantee that the light wold make right to the tip of the fibre. It was worth taking the risk.


During the construction of the tower I used quite a lot MDF as it very easy and quick to work with giving good results. I didn't want to use too much Chemiwood as it is very expensive and you can get similar results with MDF. I did however use chemiwood for making the former for the mould of the tower legs. This was agood idea as i was able to sand the chemiwood and sandseal it to a really nice smooth surface, perfect for the tower leg.
I only wanted to use acrylic mainly for the cladding and detail on the model. Having made the shapes using MDF e.g Gunwharf Quays it would be easy to clad the detail on using 1mm acrylic with etch. I also felt this would be quicker than making it any other way.


 Below is the proposed design for the football stadium for Portsmouth FC. It is a very high quality digital model.
 I like the way the model is lit below. Would like to create a similar style in lighting ,my model.
 The Millenium Bridge in London.
 The Millenium Bridge in Gateshe
 The millenium Tower in Japan
 A millenium tower in the USA.
 The Millenium Dome or 02 Dome as it is now known in London.
 The Eden Project in Cornwall.
 The new Wembley Stadium in London.
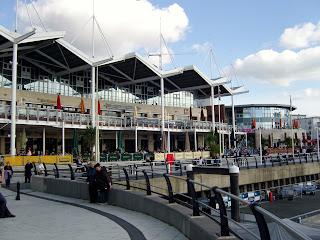

This building is from the commmercial sector, Heathrow car parks, Heathrow Airport.


 below you can see that I have started fitting some of the detail to the front of Gunwharf
